Quiz 1
Set Up
- Inside your
csci185folder, create a folder calledquizzes. - Download the starter files and unzip them. They should be unzipped in a folder called
quiz01. - Move your
quiz01folder into thequizzesfolder. - Open your entire
csci185folder in VS Code.
Your directory structure should look something like this (it’s OK if your file structure looks different, so long as the quizzes folder looks like the one below):
csci185
├── homework
├── index.html
├── lectures
├── quizzes
│   └── quiz01
├── styles.css
└── tutorials
When you’re done with that, complete the Parts 1-4 as described below:
- (30pts) HTML Tasks (index.html)
- (30pts) Styling tasks
- (30pts) HTML Tasks (other files)
- (10pts) Link from your homepage
Guidelines
- You may not move or rename any of the files.
- Read the instructions that are outlined under each section very carefully.
- Complete as many tasks as you can by the end of the quiz.
- If it doesn’t look exactly like the screenshot, don’t stress – partial credit is given!
- Just do your best.
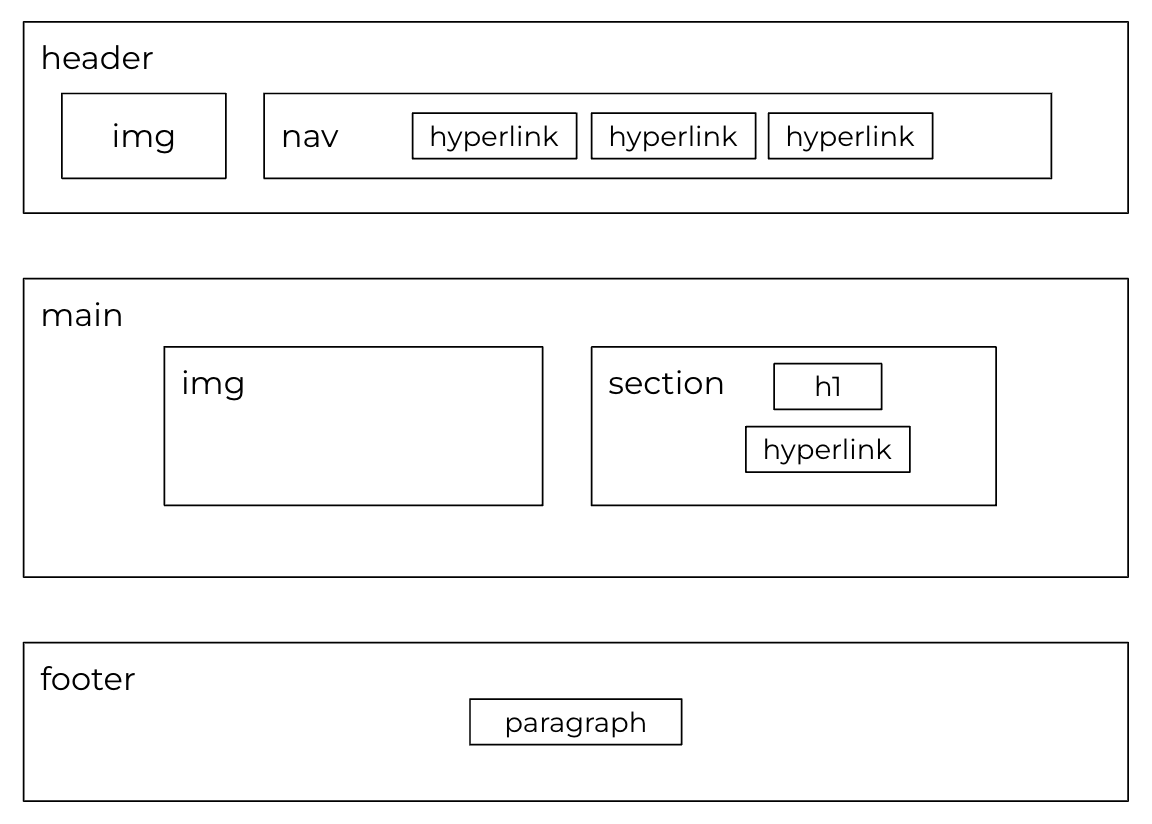
Part 1. HTML Tasks (index.html) [30pts]
For this section, you will be editing the index.html file in order to create the following structure inside of your body tag:
1. Stylesheet Link
- Inside of the
headtag in yourindex.htmlfile, add a link to thestyles.cssstylesheet (located in theassets>cssfolder).- If you did it correctly, the background of your web page should turn dark blue.
2. Semantic Structure
- Add three empty semantic tags inside the body tag:
- a
headertag - a
maintag - a
footertag
- a
3. Header & Navigation Sections
- Inside the
headertag, add animgtag that links to thetaco-temple-logo.webpfile (in theimagesfolder). - Next to the
imgtag (but still inside theheadertag), add anavtag. - Inside the
navtag, add 3 hyperlinks:- One called Menu that links to
menu.html - One called Contact that links to
contact.html - One called Hours & Location that links to
location-hours.html
- One called Menu that links to
Note that menu.html, contact.html , and location-hours.html are all located inside of the site-pages folder.

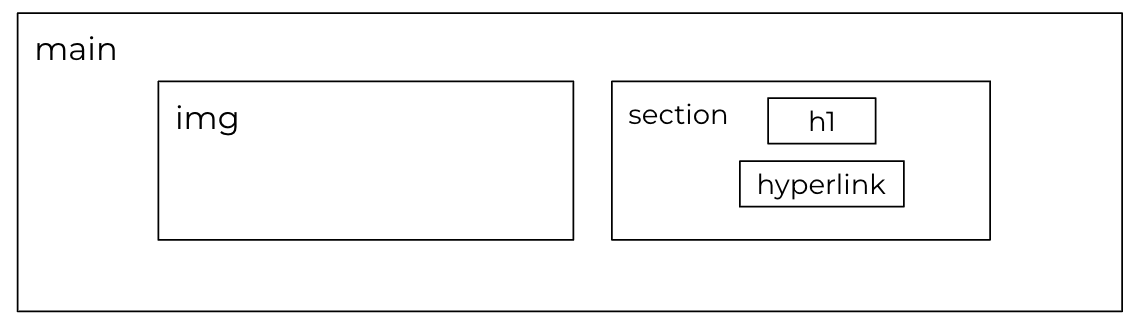
4. Main Section
- Give the
maintag a class called"landing". - Inside the
maintag, add two tags: - An
imgtag that links to thelanding-image.webpfile (in the images folder). - A
sectiontag. Inside the section tag, add two tags:- An
h1that says: “Call 828-255-8098
for take-out or click below to order online!” - A hyperlink that links to the Taco Temple order online page here: https://www.mamacitastacotemple.com/s/order. The link text should say “Order now”.
- An
5. Footer
Within the footer tag, create a paragraph tag that says “Copyright 2023, Taco Temple.”

Part 2: Styling tasks [30pts]
1. Style the header
Create a ruleset for header elements that applies the following styles:
padding: 25px 13vw;
display: flex;
align-items: center;
justify-content: space-between;
2. Style the image inside the header element
Create a ruleset for img elements inside of a header element that sets the width property to 180px
3. Style the hyperlinks inside the nav element
Create a ruleset for a elements inside of a nav element that applies the following styles:
color: white;
text-decoration: none;
margin: 10px;
text-transform: uppercase;
4. Style the main element
Create a ruleset for main elements that applies the following styles:
padding: 100px 25vw 50px 25vw;
min-height: 55vh;
5. Style the “landing” class
Create a ruleset for the landing class that applies the following styles:
background: white;
padding: 50px 15vw 100px 15vw;
display: grid;
grid-template-columns: 60% 40%;
align-items: center;
justify-content: center;
6. Style the image inside of the “landing” class
Create a ruleset for img elements inside of a landing class element that sets the width property to 100%.
7. Style the “h1” and “h2” elements
Apply the following style rules to all h1 and h2 elements:
font-family: Malamondo;
font-weight: 400;
text-transform: uppercase;
text-align: center;
This should give your h1 and h2 tags tag a funky custom font (which you’ll notice as you complete Part 3).
8. Style the “h1” element inside of the “landing” class
Apply the following style rules to h1 elements inside of a landing class element:
color: black;
line-height: 1.2em;
font-size: 1.7em;
font-family: Malamondo-Alt;
This should give your h1 tag on the landing page a slightly different custom font.
9. Style the link inside of the “landing” class to look like a button
Apply the following style rules to a elements inside of a landing class element:
 text-align: center;
background-color: #013672;
color: white;
border: solid 2px white;
padding: 10px 20px;
font-weight: 300;
margin: auto;
display: block;
width: 100px;
border-radius: 4px;
text-decoration: none;
10. Style the footer element
Create a ruleset for footer elements to:
- Give the footer
50pxof padding - center the text inside of the footer
11. Add rulesets to style the other pages
Below the styles you just created, add the following rulesets to style the other pages:
ul {
    margin-bottom: 50px;
}

h2 {
    text-align: left;
}

.location-hours {
    margin-top: 50px;
}

.location-hours p {
    margin: 0;
}

form {
    margin: 0 auto;
    width: 600px;
    padding: 20px;
    border-radius: 4px;
}


form label {
    display: inline-block;
    width: 75px;
    padding: 10px 0px 5px 0;
    margin-top: 10px;
}

form input, form textarea {
    width: 550px;
    padding: 10px;
    border-radius: 4px;
    background: #FFF;
    border: solid 1px #CCC;
    padding-bottom: 20px;
    font-size: 1.2em;
    margin-bottom: 10px;
}

form button {
    border: solid 2px #fff;
    padding: 10px 20px;
    text-transform: none;
    background: #013672;
    color: white;
    font-family: 'Work Sans', sans-serif;
    font-weight: 300;
    font-size: 1.1em;
}
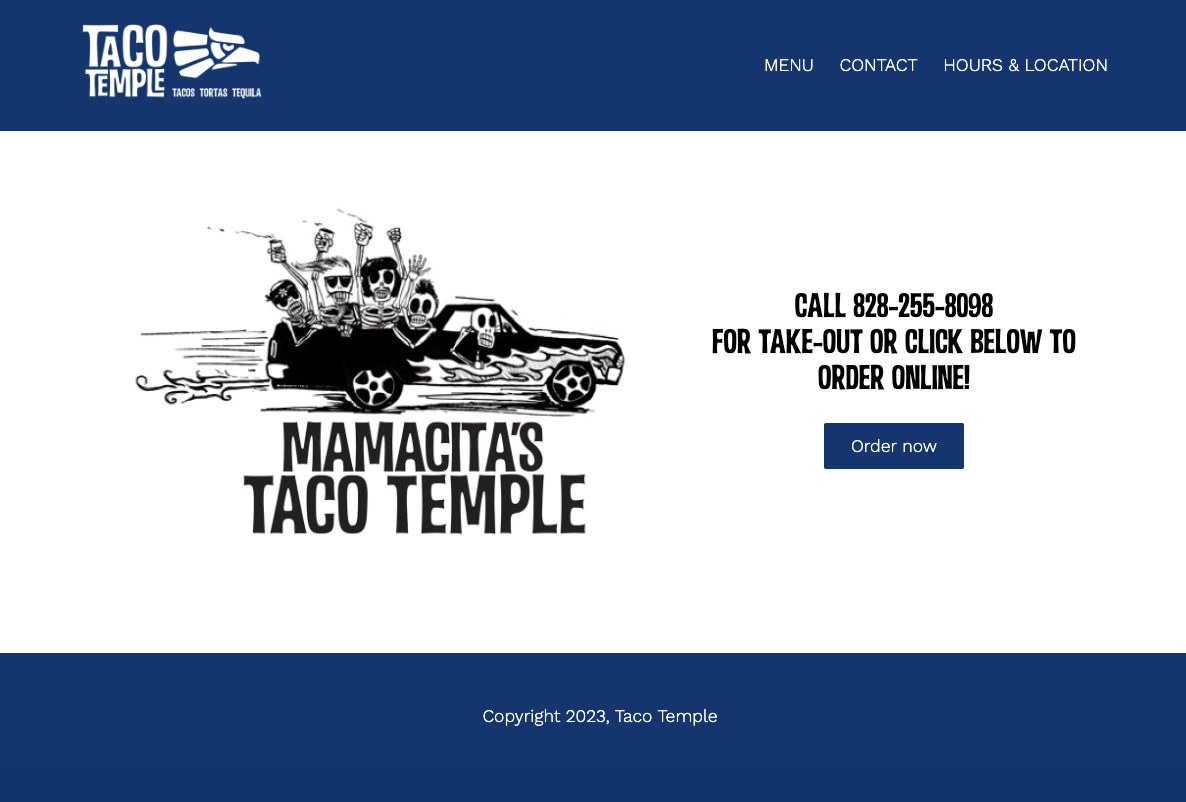
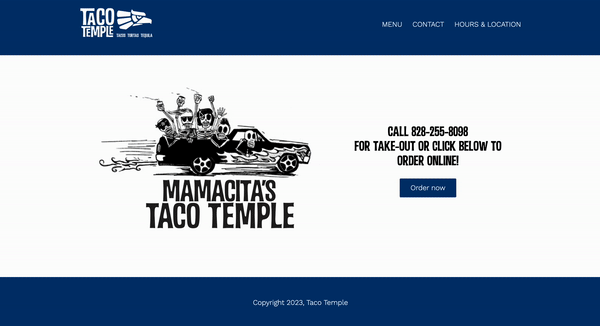
Verify that you’re done with the styling
When you’re done, the homepage should look like this:
Part 3. HTML Tasks (other files) [30pts]
Please complete the following tasks for each of the three HTML files:
menu.htmlcontact.htmllocation-hours.html
1. Stylesheet Link
- Add a
linktag inside theheadtag of each of the three HTML pages that links tostyles.css(located in theassetsfolder).- Note that the relative path will be different from what it was in
index.html
- Note that the relative path will be different from what it was in
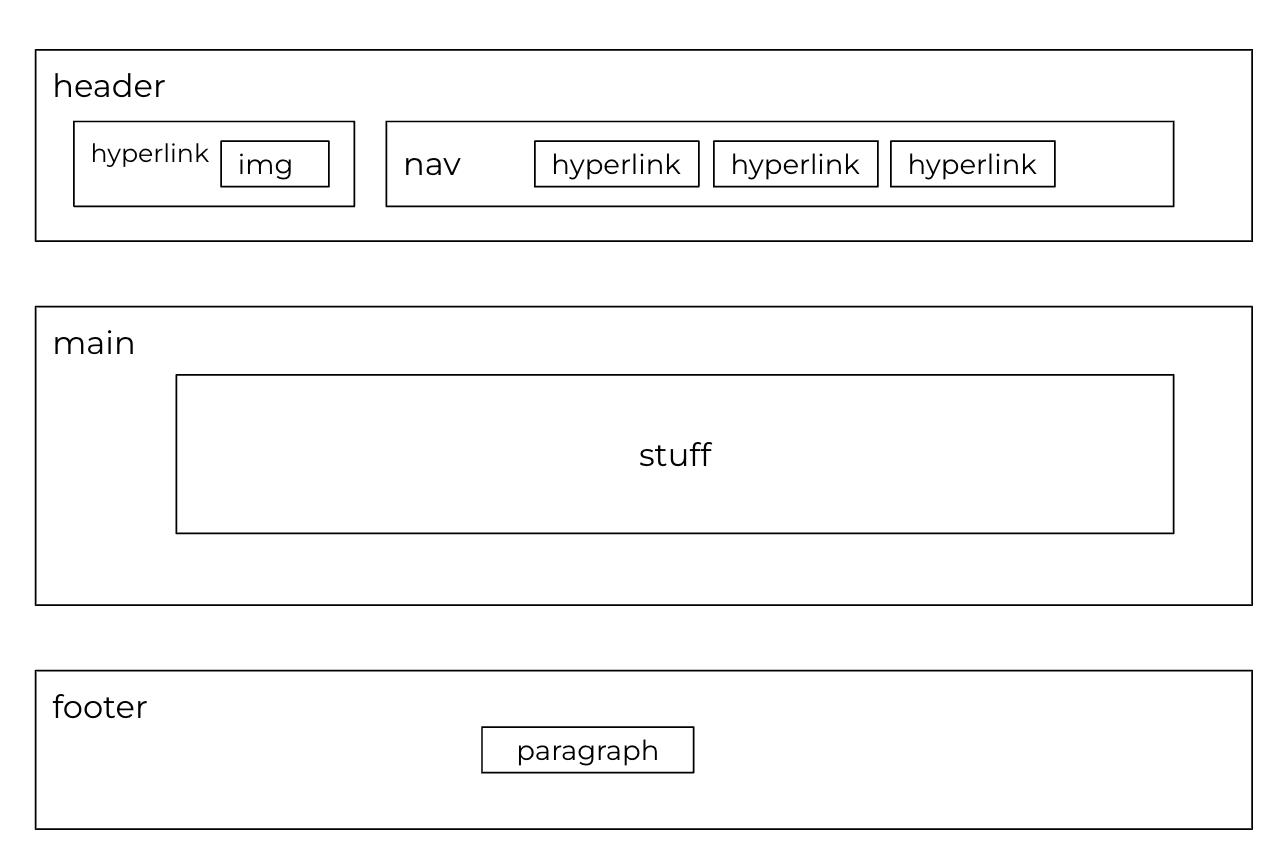
2. Header Section
- Copy the entire
headertag (and everything inside of it) fromindex.htmland paste it into each of the HTML pages above themaintag, but still within thebodytag. - Adjust the file paths for the relative links so that the relative paths don’t break (now that you’re editing a file in the
site-pagesfolder). - [Optional – 2pts Extra Credit] Make the Taco Temple logo into a link by wrapping a hyperlink (
atag) around theimgtag. This link should point toindex.htmlin the parent directory.
When you’re done, menu.html, contact.html, and location-hours.html should all link to one another.
3. Footer Section
- Copy the entire
footertag (and everything inside of it) fromindex.htmland paste it below themaintag.
Part 4: Link from your homepage [10pts]
When you’re done with the exercise:
- Update your homepage (that you made during Tutorial 3) by adding a link to the
index.htmlfile that you made in this quiz (and make sure you are using a relative link). Sarah’s quiz looks like this: - Commit and sync your changes to GitHub.
Submit
1. Verify that you’re done with the quiz
When you’re done with Parts 1-4, double-check that you’re done:
A. HTML structure
All 4 of the HTML pages you just edited should have the semantic structure (pictured below)
B. Links all work
Every page should link to every other page (no broken links).
- Note that linking from the detail pages to the index.html page is optional.
C. The website should look like this animation
D. Your homepage should link to the quiz.
2. Submit to the Moodle
Please Read Carefully: To submit Quiz 1, paste the following links into the Moodle under the Quiz 1 submission section:
- A link to your homepage on GitHub pages.
- A link to your GitHub code repository (where your code files are stored).
If your GitHub is not working for whatever reason, just zip your COMPLETED quiz01 folder and upload it to the Moodle.